


Tuesday, July 29, 2008
Steampunk Star Wars Action Figures

Although outside of what we normally do here(?) Sillof has
created a complete series of Steampunk modified Star Wars
action figures.I think this might inspire some miniature
conversion efforts....
created a complete series of Steampunk modified Star Wars
action figures.I think this might inspire some miniature
conversion efforts....
http://www.slashfilm.com/2008/04/11/cool-stuff-steampunk-star-wars-action-figures/
Monday, July 28, 2008


Massive Prussian Landship Confirmed!


The reports that the Prussians were constructing a huge
heavily armed land iron clad at their workshop in Dioscuria
where proven correct today.
See First Report:
http://vsf15mm.blogspot.com/2007/04/desert-column-1884-5.html
The German government pledges that this new weapon will
only be used to engage Martian Tripods........
The German government pledges that this new weapon will
only be used to engage Martian Tripods........
Sunday, July 27, 2008
15mm WWI ANZACS

Just won a auction is for a painted 15mm metal lot of (79)
WWI ANZACS models suited for wargames for any historical
World War I wargame system......Just need to mount them,
sweet.....
WWI ANZACS models suited for wargames for any historical
World War I wargame system......Just need to mount them,
sweet.....
WWI Super Mega-Game


December 20th WWI Mega-Game

Saturday, July 26, 2008


Wednesday, July 23, 2008
The Colonel And Co

Sunday morning, we woke up early and headed to Tom's house in
Aiken, and I ran a game of The Colonel and Co. I have made a few
tweaks since Bill and I played last. The scenario pitted the Anglo-
Prussian alliance (the Kaiser is teh Queen's son in law after all)
against the force of an Entente consisting of the Russians, French,
Italians, and renegade Confederates. The entire scenario is posted
Toms' Aeronef

One of the guys in my gaming group talked me into getting some of
these nice models. We tried the rules they were designed for and
didn’t like them. We then tried some ‘home’ rules and they were too
complex. We are hoping that the newly released ‘Ironstars’ rules
will be a good starting point. The models are great and the possibilities
are endless in regards to story lines, we just need a good set of rules.
Unfortunately it had been a long time since I painted something this
small and it shows…these are definite candidates to be stripped and
Monday, July 21, 2008

A Father/Son Consultation

I have always been interested in playing games with toy-soldiers, and started doing it 'properly' with rules and such (wargaming) when I was about 10 or 11. However I was too young to join our local wargames club. My dad was less interested in the games, but did have an interest in military history, so joined up so that I could go along with him. Of course he became as active a member as I (in fact more so), and we both wargame regularly. So I have him to thank for allowing me to pursue my hobby and he has me to thank for introducing him to a new one :-)
http://flickr.com/photos/95492938@N00/2580793392/
http://flickr.com/photos/95492938@N00/2580793392/
Sunday, July 20, 2008
Rules Amalgam...

I had a thought regarding both Volley And Bayonet and
Raj Grunt. How about a amalgamation of the two rule sets?
Simply use the fire tables from Raj Grunt and movement
rates and stands from Volley And Bayonet. Will require a bit
of tweaking perhaps but it should work.
Raj Grunt. How about a amalgamation of the two rule sets?
Simply use the fire tables from Raj Grunt and movement
rates and stands from Volley And Bayonet. Will require a bit
of tweaking perhaps but it should work.
Hurray for the Red, White and Who!!

Somewhere in Russia 1919
By Greg Novak
Designer Notes
This project started due to the fact that I have a nice collection of Russian Civil War 20mm figures. I have used them with Command Decision in the past but rarely have had a chance to use at conventions games. My interest was in doing a multi side game with less of an emphasis on the tactical system and more on a system that would be easy to teach to novice miniature players. V & B with its move countermove system is easier to teach and the fact that the Mid West HMGS Little Wars: has a theme of "Civil Wars" was enough to push me into gear to try things out.
Troop and Stand Sizes
Based on the fact that I wanted to have players running brigade commands, I decided that I would use a ground scale of 1" equals 50 yards, and 1 SP equals 80 men or two weapons. Infantry stands would be regimental sized, 3" by 1.5", and have 2 to 3 SP¹s with five to seven figures per stand.
Detachments are have stands 1.5" by 1" of 1 SP, and are used for holding trenches. They have three figures each. I have some magnetic stands which allow me to put two detachments together to make a regular infantry stand. Cavalry stands would be of a similar size, and have 2 SP's per stand with three to four figures a stand. Machine gun and artillery stands would be 1.5" by 1.5" and be of 2 SP's each, with two to three figures per stand.
Armored trains would have one to two cars for each train, while armored cars and light tanks are on stands 1.5" wide by 3" deep, as are machine gun carts.
Medium tanks are on 3" by 3" stands. Vehicle stands are usually of 2 SP's each. Commanders are represented at the battalion level (UC or DC), brigade level (CC) and army commander and are mounted on washers.
While a full strength battalion can have three to four infantry stands, my RCW armies also have battalions of two stands, or even one stand. Hence the use of DC for of the larger formations, and UC for the smaller units.
For the record, while Red¹s and White¹s are easy to understand I have added in the Green¹s local independents Poles, Cossacks and others as well as the Blues our foreign interventionists British American Canadians - French and Czech's with some interest in adding others. My prize unit is a battalion of "Balts" under the command of a British officer the British government funded several German Freikorps for service in Russia but to avoid public embarrassment these units were christened as "Balts".
Would be interested in comments and feedback.
Sequence of Play:
The White/Blue side goes first, though all five phases listed below.
Then the Red/Green side follows in turn.
- A. Command Determination
- B. Movement
- C. Rally
- D. Morale Checks for both sides
- E. Combat for both sides
Command Control:
Stands within 6² of a superior officer are in command. Units not within 6" of a superior officer may only move half of their total movement allowance; may not recover from disorder; will be placed in disorder if they move, and may never move towards a visible enemy unit.
All armored cars and tanks are considered as self-ordering, they are always in command and can recover from disorder on their own.
Movement:
All non-poorly trained stands are allowed a free facing. The second facing costs 50% of the unit¹s movement. A player may change facing without paying the 50% cost, but the unit will be disordered. A poorly trained stand, which changes facing, does so at a cost of 50% of the unit¹s movement.
For a unit to reform from disorder costs 50% of the units movement.
Limbering and unlimbering are both considered a change of facing but only horse artillery may do both in the same turn.
Movement Rates:
- Infantry Stands 16"
- Mounted Cavalry Stands 24"
- Medium Machine Gun Stands 12"
- Light Machine Gun Stands 16"
- Machine Gun Carts 20"
- Motorized Vehicles 24"
- Light Tanks 12"
- Heavy Tanks 8"
- Armored Trains 32"
- Mortars 12"
- Limbered Heavy Artillery 12"
- Limbered Field Artillery 16"
- Limbered Horse Field Artillery 20"
- Carts 16"
- Wagons 12"
- Commanders 24"
Terrain Costs:
Road March: All stands may move in travel march along roads at a rate of triple speed, or cross-country at double speed. It takes one half turn to recover from travel march, and the stands if attacked may not fight back Motorized Vehicles on roads move 2" for every 1" of movement moved. They may freely follow roads without having to pay costs for any twists or turns along the road. This movement is in addition to the use of travel march used by vehicles and these units may engage in combat.
Armored Trains: Armored Trains wishing to engage in combat must move at half speed or less.
Built Up Terrain: All non-vehicle stands moving into a built up areas do so at a cost of 50% of their movement and are disordered on the turn that they enter the area. Stands, which are marching through a town, do not pay this penalty.
Streams All stands pay half of their movement to cross the stream. Vehicles may only cross at marked fords or bridges.
Marsh: Units crossing a marsh lose half their movement and are disordered while crossing. Vehicles may not enter a Marsh.
Woods: All non-vehicle stands pay 2" for every 1" moved in woods. In addition, all stands may not recover from disorder unless on an edge of a wooded area. Vehicle stands including tanks pay 4" for every 1" moved in woods.
Barbed Wire: Wheeled vehicles and mounted units cannot cross barbed wire. Infantry and machine gun stands may cross barbed wire at a cost of 50% of their movement, and are disordered. Tanks can cross barbed wire, and remove a 3" segment of wire at the point that they cross.
Trenches: wheeled vehicles may not cross Trenches. Mounted units can cross a trench at the cost of 50% movement, and are disordered after crossing,
Rally:
Routed units, which are in contact with a superior officer, may be rallied at this point. Routed units may make a free facing as part of the rally, but may not otherwise move. Rallied units are considered permanently disordered for the remainder of the game.
Morale:
All stands which are in contact with an enemy stand, or which are within close range of any enemy infantry and artillery stand must check morale. The unit¹s morale number is modified by the following:
To pass a morale check, roll a D6 for equal or less than the units modified morale number.
- Infantry/Artillery defending high ground and stationary +1
- Meleeing enemy unit in flank +1
- Army or Corps Commander attached to unit +1
- Unit in works +1
- Unit in trenches +2
- Disordered -1
- Meleeing Artillery/Machine Guns from front -1
- Attacked by mounted cavalry* -1
- Attacked from the flank -2
- Enemy tank within 4" -2
Infantry or machine gun stands which pass their morale against enemy cavalry will get a +1 to their defensive fire in melee.
Combat:
All stands roll the following number of die for attacks and counterattacks:
Infantry Stands roll three (3) dice in melee and in fire. If the infantry stand is stationary, it will roll an additional three (3) dice for melee and fire.
Detachments roll one (1) dice in melee and in fire. If the detachment is stationary, it will roll an additional one (1) dice for melee and fire.
Light Machine Gun Stands roll two (2) dice in melee and in fire. If the stand is stationary, it will roll an additional one (1) dice for melee and fire.
Medium Machine Gun Stands may only fire if they do not move; they roll three (3) dice for both fire and melee. They gain one (1) if they are stationary.
Medium Machine Gun Carts may fire if they move; they roll two (2) dice for both fire and melee. They may not go stationary.
Mounted Cavalry Stands roll two (2) dice for melee. They may not fire mounted.
Massed Mounted Cavalry Stands roll four (4) dice for melee. They may not fire mounted.
Artillery Stands roll two (2) dice in direct fire, and one (1) die in indirect fire. If stationary, it will roll one (1) additional dice for both fire and melee.
Armored Trains have two medium machine gun stands per car, which may fire to either side. Each stand rolls three (3) dice for both fire and melee. They may not go stationary. In addition some armored trains mount an artillery battery.
Armored Car Stands roll two (2) dice for fire and melee. They may not go stationary.
Light Tank Stands roll two (2) dice for fire and melee. They may not go stationary but count as Shock when attacking in melee.
Medium Tank Stands roll four (4) dice for fire and melee. They may not go stationary but count as Shock when attacking in Melee.
Fire Combat:
| Type | Close Range & Hit | Long Range & Hit |
| Infantry Stands | 8"(5-6) | 16" (6) |
| Light Machine Guns | 8" (4-6) | 16" (6) |
| Medium Machine Guns | 12" (4-6) | 24" (6) |
| Machine Guns Carts | 8" (4-6) | 16" (6) |
| Armored Cars | 2" (4-6) | 8" (6) |
| Tanks | 1" (4-6) | 4" (6) |
| Artillery Type | Direct (30") | Indirect |
| Mortars | (5-6) | - |
| Field Guns | (4-6) | (6) |
| Heavy Guns | (4-6) | (5-6) |
Saves:
Stands save on a die roll of 4-6 under the following conditions:
Single Saves:
- Artillery from any hits by artillery except heavy guns
- Armored cars from hits by small arms
- Tanks and armored trains from artillery fire
- All stands in works from fire
- All stands from hits by disordered stands
- All stands in woods
- Veteran infantry stands not in cover
- Cavalry / armored cars electing to retreat 6" if fired upon
- Stands in trenches from melee
Double Saves:
- Stands in trenches from fire
- Tanks and armored trains from small arms fire.
The Defence of Duffer's Drift

Preface
This tale of a dream is dedicated to the "gilded Popinjays" and "hired assassins" of the British nation, especially those who are now knocking at the door, to wit the very junior. It embodies some recollections of things actually done and undone in South Africa, 1899-1902. It is hoped that its fantastic guise may really help to emphasize the necessity for the practical application of some very old principles, and assist to an appreciation of what may happen when they are not applied, even on small operations. This practical application has often been lost sight of in the stress of the moment, with dire results, quite unrealised until the horrible instant of actual experience. Should this tale, by arousing the imagination, assist to prevent in the future even one such case of disregard of principles, it will not have been written in vain. The dreams are not anticipations, but merely a record of petty experiences against one kind of enemy in one kind of country only, with certain deductions based thereupon. But from these, given the conditions, it is not difficult to deduce the variations suitable for other countries, or for those occasions when a different foe with different methods of fighting and different weapons has to be met.
Backsight Forethought, June 1907
VSF Army Of Andy Gorman

Report By Robin Sutton:
Today we ran a HotT (Hordes of the Things) games day at the local wargames
club.. of interest here would be the VSF army of good friend Andy Gorman...
There are some photos here:
http://wargamingnz.blogspot.com/
We especially loved Andy's Airboat, flyers (balloons) and behemoths (steam tanks),
although his Victoria's Finest were superbly painted as well.
You can spot them (hopefully) amongst the photos.
Cheers
Robin
Saturday, July 19, 2008


Russian Armored Trains

As it is well known, the idea to create the first armed trains
appeared in the middle of the XIX century. But the first practical
steps were made only during the Anglo-Boar War, when British
troops had to protect their railroads, which served as main
transport and supply routes, from Boar diversions. First, these
trains were just common locomotives towing flat cars with field
guns placed on them. The Next step was made while increasing
the survivability and firepower of the armed trains, hence common
passenger or coal cars got covered with iron plates with openings
made for small arms and coupled with armored locomotive (usually
protected with sand bags or chains). Such trains are usually called
blinded trains (to differentiate them from typical special-built
armored trains). Finally, typical car armoring styles were developed,
as well as armored locomotives.
http://www.tdg.nu/articles/historical%20articles/Armoured%20Trains/Soviet%20Armored%20Trains.htm
Yet More Gunboats!

TSS Melik a model that made by Taran to accompany HaT's marvelous Colonial figures including the Camel Corp and, hopefully, the Naval Brigade.
HaT Industrie 8000 series

Victorian Era
8179 Gatling Gun and Crew*
8180 Nordenfelt Gun and Crew*
8181 British 17th Lancers*
8182 Natal Native Horse*
8191 Zulu Warriors*
8192 Natal Native Contingent*
8193 Egyptian Camelry*
8194 British Camel Corps*
8202 Colonial Highlanders*
8203 Colonial War Indians*
8206 Frontier Light Horse*
8207 Baggage Camels*
8208 Mahdist Camelry*
8209 British Mounted Infantry*
8210 Colonial Artillery*
***************
WWI
8060 WWI Austrian Inf
8061 WWI Russian Inf
8070 WWI Ottoman Inf
8071 WWI ANZAC Inf
8080 WWI Russian Heavy Weapons
8081 WWI Austrian Heavy Weapons
8094 WWI Ottoman Artillery and Machine guns
8109 WWI German Artillery
8110 WWI German Heavy Weapons Set
8111 WWI Canadian Infantry
8112 WWI US Infantry
8113 WWI FT-17 with 37mm cannon
8114 WWI FT-17 with Hotchkiss machine gun
8122 WWI Serbian Infantry
8123 WWI German Colonial Infantry
8148 WWI French Infantry (kepi)*
8153 WWI Australian Light Horse*
8158 WWI US 75mm gun with crew*
8159 WWI French 75mm gun with crew (kepi)*
8161 WWI French 75mm gun with crew (helmet)*
8199 WWI German Jaeger*
8200 WWI German Infantry*
81xx WW1/2 Six horse train and limber*
* Future items.
Friday, July 18, 2008
Building A Gunboat

Colonial era gunboat
Mr. Nuno M. Cabeçadas
Portugal
Before starting its a good to have a general idea of the final
layout and draw it with some measures to check how it looks
and if something must be changed. I try to have places for at
least one weapon, either a small gun or a machine gun, a flat
area for figures and places for the crew. I start working on my
boats with the drawing of the hull shape and try to made them
with 30-40 cm long and 6-8 wide because its an acceptable
balance between they own size and the dimensions of a
wargame table. The drawing is cut and glued over the 2 mm
plastic sheet and used as a guide for the shape of the hull. pics
Treachery Tovarich!

By Peter Hunt:
If you are not confused you don’t understand the situation”.
Whilst this aphorism was true of many wars it was especially
suited to the variety of participants and complicated series of
alliances and motives that marked the Russian Civil War. This
confusion was well demonstrated at the little battle of Vanzhai
Junction that took place in the war’s third year, deep in the
Ukraine .
http://www.hksw.org/treachery.htm
Our Grandfathers' Wars

Or
By George! Parallel Lives in the
British Army a Hundred Years Ago
Part III: Early Days and Darkest Hours
by Peter Hunt
By George! Parallel Lives in the
British Army a Hundred Years Ago
Part III: Early Days and Darkest Hours
by Peter Hunt
Thursday, July 17, 2008
OTTOMAN/GERMAN ORDERS OF BATTLE

PALESTINE CAMPAIGN 1917-18
Because of the sheer size of this wargames campaign it
was not possible to provide model soldier equivalents
of every regiment and battalion, battery, etc. Instead
a table of organization was produced, as on the following
pages. Units of Infantry, Cavalry, Artillery, etc. were
then raised and painted up. These formations were able
to be added together etc. in order to achieve the forces
in any one specific battle. As some battles involved more
than one division, the number of miniatures had to be
rather large, even so. The figure scale used is 1:50 and
the battles fought out mostly under 'BIRTH OF A CENTURY"
rules, by Mal. WRIGHT.
Notes On The Dark Continent

Being a survey of the East African interior regions made in the year 1889 for the purposes of providing information to the intrepid traveler, together with gaming ideas and divers rules, for players of Space 1889 and other systems of role-playing and wargaming, by an Old Africa Hand.
Beyond the fast-shrinking realms of the Sultan of Zanzibar lie lands, as yet barely known to the European. Yet, though solid information is sorely lacking, the romance of Africa looms large in the Victorian imagination. Few places can inspire the collective mind of the British public than the vast, unexplored regions of swamp, Savannah and forest of the Dark Continent; there the great rivers known as the Nile and the Congo rise from mythic sources deep in exotic, undiscovered places. Ho ! for the Mountains of the Moon - - wherever they might turn out to be.
Tuesday, July 15, 2008
Storm The Oasis Village !

This is one of the many small actions fought between Bedouins and the
foreign legion during the French conquest of the Sahara. The key to
controlling the desert was the oasis villages. It was vital that an attack
succeeded quickly, because a force which was unsuccessful would be
very low on water and may not make it back to the next supply point.
foreign legion during the French conquest of the Sahara. The key to
controlling the desert was the oasis villages. It was vital that an attack
succeeded quickly, because a force which was unsuccessful would be
very low on water and may not make it back to the next supply point.
Mars Patrol

Here are a few pictures of one of our Victorian science fiction games.
This was a small skirmish game situated on Mars. It was designed
more like a roleplaying game to see how the players would react
when confronted with a series of small problems (sandstorms,
unknown creatures, nomad bandits, etc), instead of an enemy force
as expected in a normal wargame.
This was a small skirmish game situated on Mars. It was designed
more like a roleplaying game to see how the players would react
when confronted with a series of small problems (sandstorms,
unknown creatures, nomad bandits, etc), instead of an enemy force
as expected in a normal wargame.
1 July 1916: The Somme

Comprising the main Allied attack on the Western Front
during 1916, the Battle of the Somme is famous chiefly
on account of the loss of 58,000 British troops (one third
of them killed) on the first day of the battle, 1 July
1916, which to this day remains a one-day record.The
attack was launched upon a 30 kilometer front, from
north of the Somme river between Arras and Albert,
and ran from 1 July until 18 November, at which point
it was called off.
BATTLEFIELD DETECTIVES: World War I - The Somme

During World War I, trenches and barbed wire ran across
the Europe, from Switzerland to the North Sea.
The Battle of the Somme was one of the largest battles of
The Battle of the Somme was one of the largest battles of
the First World War, with more than one million casualties.
At 7.30am on July 1st, 1916, after a devastating artillery
At 7.30am on July 1st, 1916, after a devastating artillery
bombardment lasting more than a week, 100,000 British
soldiers waited in their trenches ready to advance on the
German lines.
Monday, July 14, 2008
Defending Saragarhi: 12 September 1897

A truly inspiring and chilling article on the famous Battle of Saragarhi.

Sunday, July 13, 2008
World War I Africa

1914 - Germany had 4 colonies in Africa, small islands
in the Pacific, and 400-sq mi China enclave called Kia-
Chow in Shantung. The campaign in East Africa (today's
Kenya and Tanzania and Rwanda and Burundi) was the
longest in WWI.
in the Pacific, and 400-sq mi China enclave called Kia-
Chow in Shantung. The campaign in East Africa (today's
Kenya and Tanzania and Rwanda and Burundi) was the
longest in WWI.
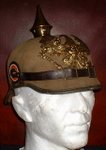
Polizeitruppe: Deployment of German Colonial Police Forces, May 1914

The figures shown here are Airfix Japanese infantry, converted
to German East-African Polizei-Askari. The steel helmet has
been carved into a pillbox cap. Other Japanese figures wearing
a field cap with neck flap may be converted in a similar fashion.
The advantage of using the Airfix Japanese figures is that they
already wear the proper type of puttie.
to German East-African Polizei-Askari. The steel helmet has
been carved into a pillbox cap. Other Japanese figures wearing
a field cap with neck flap may be converted in a similar fashion.
The advantage of using the Airfix Japanese figures is that they
already wear the proper type of puttie.
King's African Rifles, 1914 - 1918

A machine-gun section of the King's African Rifles (KAR).
The three machine-gunners have had the Japanese steel
helmet carved into a fez. The Corporal commanding the
section is an ESCI 1:72 scale British colonial infantryman.
The conversion would be more convincing, if the Japanese
Nambu machine-gun had been replaced with a Vickers
machine-gun taken from EMHAR's British WW1 Artillery.
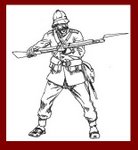
Reichskolonialamt : Deployment of German Colonial Troops, May 1914

A German officer, sergeant, and Askaris of the Schutztruppe
(protection force) for German East Africa, deployed in line
with right flank refused. These 15 mm Peter Laing miniatures
represent an infantry platoon in colonial wargames using The
Sword and the Flame rules.
(protection force) for German East Africa, deployed in line
with right flank refused. These 15 mm Peter Laing miniatures
represent an infantry platoon in colonial wargames using The
Sword and the Flame rules.
Saturday, July 12, 2008

Yellow cloud north of Ypres

Just got round to reading the After Action Reports section , and I particularly like this one!
************************************************************************
************************************************************************
This fictional scenario was based around several key events that occurred during the Second Battle of Ypres in 1915. The scenario was set shortly after the first German attacks, with allied forces having been sent reeling backwards after the first horrific German gas attacks. A BEF division has been sent forward in an attempt to re-establish the line. (Why BEF? Because that is the only allied division that I have painted so far). The advanced Brigade of the division has been able to scratch out some light entrenchments across their part of the front, and the Germans have done little more, as the scale of their success has not been apparent to their Generals. As dawn approaches, the command comes down to the British Brigade commander to pull back from their entrenchments, as further gas attacks are expected on the front line. Mutterings like "Bloody 'ell Jack, we just finished diggin' these bloody 'oles, an' now they wants us to up an' leave 'em" were heard at frequent intervals as the Tommys pulled back. In the meantime, the other two brigades of the division were marching forward to join their comrades in the coming day's fight. The German commanders were Keith McNelly and Stan Walker, while the British division was commanded by Mike Toohey and Robin Sutton.
Wednesday, July 9, 2008
U.S. Cavalry Museum Fort Riley, Kansas

Originally called Camp Center, Ft. Riley was established in the 1850s to provide protection to immigrants migrating westward on the Oregon and Sante Fe Trails. Its cavalry units policed the Kansas Territory during the pro and anti-slavery bloodshed that preceded the Civil War and it was the last home of General George Armstrong Custer before he met his fate at the battle of the Little Big Horn. The museum includes exhibits of cavalry activities from their early beginnings in the Revolutionary War up to their modern deployment in the Persian Gulf. It also features the work of outstanding military artists in both oil and bronze.
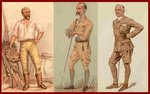
Rough Riders Col. Theodore Roosevelt's 1st Volunteer Cavalry

The following is a point-by-point account
of the Rough Rider's Charge up San Juan Hill.
The numbers on the description below correspond
to the numbers on the map above. We thank Osprey
Publishing for their generous permission to reprint
this map taken from pages 74 and 75 of Angus Konstam's
San Juan Hill 1898: America's Emergence as a World Power
http://www.theodore-roosevelt.com/trrr.html
Zulu Dawn

The sun dawned bloodied...two great armies
met face to face...and the earth trembled to
the sound of the Zulu death chant!
Shaka Zulu

The true story of the life and rise to power of
Shaka, the greatest Zulu leader in history.
Starting from his birth, this film takes us
through his difficult childhood, his taking by
force the leadership of the Zulu nation, and
then to his dramatic fall, due mostly to the
influences of the British colonialists
Shaka, the greatest Zulu leader in history.
Starting from his birth, this film takes us
through his difficult childhood, his taking by
force the leadership of the Zulu nation, and
then to his dramatic fall, due mostly to the
influences of the British colonialists
Rough Riders

The real-life story of Teddy Roosevelt's role in the
Spanish-American war is re-told in this made-for-
television movie. Tom Berenger stars as Roosevelt,
who in 1898 formed his own volunteer calvary to go
into Cuba and fight the expansion of Spanish rule.
Thousands of men from all walks of life volunteered,
but Roosevelt honed the team down to over 500
fighting men. When they finally arrived in Cuba, they
faced a well-equipped Spanish army and squared off
in the famous Battle of San Juan Hill.
55 Days at Peking

Diplomats, soldiers and other representatives of
a dozen nations fend off the siege of the International
Compound in Peking during the 1900 Boxer Rebellion.
The disparate interests unite for survival despite
competing factions, overwhelming odds, delayed relief
and tacit support of the Boxers by the Empress of
China and her generals.
The Sand Pebbles

Engineer Jake Holman arrives aboard the gunboat
U.S.S. San Pablo, assigned to patrol a tributary of
the Yangtze in the middle of exploited and revolution
-torn 1926 China. His iconoclasm and cynical nature
soon clash with the "rice-bowl" system which runs the
ship and the uneasy symbiosis between Chinese and
foreigner on the river. Hostility towards the gunboat's
presence reaches a climax when the boat must crash
through a river-boom and rescue missionaries upriver
at China Light Mission.
Subscribe to:
Comments (Atom)

