


Ulundi: the final battle of the Zulu War at which the army of Cetshwayo was destroyed.
War: Zulu War
Date: 4th July 1879
Place: Central Zululand in South Africa
Combatants: British against the Zulus
Generals: Lieutenant General Lord Chelmsford against Cetshwayo, the Zulu King.
Size of the armies: 17,000 British and native troops against some 24,000 Zulus.
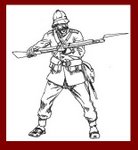
Uniforms, arms and equipment: The Zulu warriors were formed in regiments by age, their standard equipment the shield and the stabbing spear. The formation for the attack, described as the “horns of the beast”, was said to have been devised by Shaka, the Zulu King who established Zulu hegemony in Southern Africa. The main body of the army delivered a frontal assault, called the “loins”, while the “horns” spread out behind each of the enemy’s flanks and delivered the secondary and often fatal attack in the enemy’s rear.
Cetshwayo, the Zulu King, fearing British aggression took pains to purchase firearms wherever they could be bought. By the outbreak of war the Zulus had tens of thousands of muskets and rifles, but of a poor standard, and the Zulus were ill-trained in their use. The Zulus captured some 1,000 Martini Henry breech loading rifles and a large amount of ammunition. Some of these rifles were used at Rorke’s Drift. All the British casualties, few though they were, were shot rather than stabbed.
Winner: The British
British Regiments:
Royal Artillery:
17th Lancers: now the Queen’s Royal Lancers.
1st Battalion, 13th Light Infantry: later the Somerset Light Infantry and now the Light Infantry.
2nd Battalion, 21st Royal Scots Fusiliers, now the Royal Highland Fusiliers.
58th Regiment: from 1882 the Northamptonshire Regiment, now the Royal Anglian Regiment.
80th Regiment: from 1882 the South Staffordshire Regiment, now the Staffordshire Regiment.
90th (Perthshire) Regiment: from 1882 the Scottish Rifles (Cameronians), disbanded in 1966.
94th Regiment: from 1882 the North Staffordshire Regiment, now the Staffordshire Regiment.
Account:
Following the battle at Gingindlovu on 2nd April 1879, Lord Chelmsford’s force advanced to the fortified camp at Eshowe and relieved Colonel Pearson’s command, entrenched there since the end of January 1879. Pearson’s men had put all their effort into building the camp in the expectation that it would be used as the advanced base for the final assault on the Zulu King, Cetshwayo’s Royal kraal at Ulundi. To the disappointment of Pearson’s men, Chelmsford ordered a retreat to the Tugela, intending to establish a base nearer to the border river.Superficially the Zulus appeared to have thrown the British back to their starting point. But the battles of Khambula and Gingindlovu inflicted heavy casualties on the Zulus that could not be replaced. Reacting to the horror of Isandlwana the British government sent out more reinforcements than could effectively be used. Natal was awash with British major generals. Sir Garnet Wolseley and the Ashantee Ring were on their way to displace Lord Chelmsford in command.Chelmsford by the middle of April 1879 prepared to invade Zululand again with 2 cavalry regiments (the King’s Dragoon Guards and the 17th Lancers), 5 batteries of artillery and 12 infantry battalions: 1,000 regular cavalry, 9,000 regular infantry and a further 7,000 men with 24 guns, including the first Gatling battery to take the field for the British army. The Zulus could maintain 24,000 dispirited warriors.
Chelmsford re-organised his army. Evelyn Wood’s force in the West was renamed the Flying Column. The newly arrived Major General Henry Crealock, who had served with the 90th Perthshire Regiment in the Crimea, took over Pearson’s old command, now entitled the 1st Division, in the lower Tugela by the coast and a new command entitled the 2nd Division under Major General Newdigate but accompanied by Chelmsford himself prepared to invade Zululand in the central area and join up with Wood.
The British were still nervous of the Zulus, heavily influenced by the terrible events at Isandlwana. For his part Cetshwayo had lost faith in his ability to repel the British invasion. Wood began to march south from Khambula while Chelmsford prepared to cross the Tugela. There was one outstanding duty to fulfill before the army could turn its attention to defeating Cetshwayo.
On 21st May 1879 Major General Marshall with his cavalry brigade of the 2 regular regiments moved forward to Isandlwana and undertook the task of burying the British casualties from the battle on 22nd January.
| The advance of Chelmsford’s 2nd Division finally began on 1st June 1879. But the war had not finished its stock of horrors for the British. As Chelmsford sat in his tent writing dispatches a staff officer burst in to tell him of the death at the hands of the Zulus of the French Prince Imperial. In 1871 the Emperor Napoleon III of France had abdicated and retired to England where he had died. His widow, the Empress Eugenie became a great friend of Queen Victoria. Napoleon’s son Louis, the Prince Imperial, attended the Royal Military College at Woolwich. On the intercession of the Queen the Prince Imperial was permitted to accompany the army to Natal and join Chelmsford’s column. While with an advanced patrol and dismounted he was caught and killed by the Zulus. The Prince’s death caused an outcry in France. Lieutenant Carey of the 98th Regiment, nominally in charge of the patrol was tried by court martial but acquitted. As the war continued the Flying Column and the 2nd Division met and marched towards Ulundi in parallel. |
On 5th June 1879 Buller’s irregular horsemen encountered a strong force of Zulu skirmishers. After exchanges of fire it became clear that the Zulus would not give ground and Buller withdrew.The 17th Lancers came up and, keen to establish themselves, rode down the valley looking for the Zulus. The Lancers came under fire and their adjutant was shot and killed. The whole mounted force returned to camp where the unfortunate death of the officer adversely affected the whole column.
On 6th June 1879 a piquet caused a false alarm and the whole column rushed to take position in the entrenched area of the camp. Fire was given and some 1,200 rounds discharged before the troops could be brought under control. It was symptomatic of the nervousness these inexperienced troops felt about the Zulus.
Wolseley arrived in Cape Town on 28th June 1879 and cabled Chelmsford who replied that his two columns were within 17 miles of the Royal Kraal of Ulundi.Cetshwayo attempted to negotiate with the British while his warriors gathered at Ulundi for the great last fight. The terms Chelmsford demanded were rejected with indignation by the Royal Council.
On 30th June the Flying Column and the 2nd Division advanced into the valley of the White Mfonzi towards Ulundi. Camp was established by the river. On 3rd July 1879 Colonel Buller took his mounted men across the river to reconnoitre the Zulu position. The Zulus were waiting in ambush for Buller and his force only just escaped annihilation.
During the night the British troops were forced to listen to the Zulu war songs. For some it was an interesting experience, for others unnerving.
With reveille the next day Chelmsford took the majority of his force with only ammunition and water and crossed the river advancing towards the Zulu kraal, moving in the cumbersome hollow square, the mounted troops covering each side and the rear.
Just before 9am the Zulus attacked the hollow square on all sides.
The fire from the packed British regiments, the artillery and the Gatling guns was overwhelming. It was the largest concentration of British military might in South Africa to that date. Prisoners stated after the battle that they were overwhelmed by the noise of the firing, let alone the impact of the bullets, and stunned by the size of the British force. It took only half an hour before the Zulus began to falter.At this point the 17th Lancers passed out of the back of the square and charged. The impact of the charge broke up what was left of the Zulu formations and the Zulu army dissolved in flight, pursued by the Lancers and the mounted irregular units of Chelmsford’s columns. The massacre of fleeing Zulus seen at Khambula and Gingindlovu was repeated and multiplied several times. It was the end of the Zulu army and the war, although fighting continued on a small scale for some weeks. As soon as the battle was over Chelmsford ordered his troops to burn the Royal Kraal of Ulundi.
Casualties: The British casualties were 3 officers and 79 men. Zulu casualties were said to be 1,500.
Follow-up: Following the battle the British burnt the military kraals in the area around Ulundi. The Zulu chiefs began to surrender across Zululand to the British forces. Cetshwayo, the Zulu king, was captured on 28th August 1879 and taken into exile in Cape Colony. The British established a regime in Zululand considered to be sympathetic to Britain and withdrew.
Regimental anecdotes and traditions:
The Zulu War was one of the last campaigns fought by the old numbered infantry regiments of the British Army. In 1882 the Cardwell Reforms brought in the system of two battalion regiments, by combining the single battalion regiments in pairs and assigning formal regional titles. The regiments up to the 25th Foot already had two battalions and simply took the new titles. The 24th Foot, which had both its battalions in the Zulu War, fighting at Isandlwana and Rorke’s Drift, from being the South Warwickshire Regiment became the South Wales Borderers; the shift in focus from the English West Midlands to Wales being a nod to the Welsh origins of the soldiers of B Company of the 2nd Battalion who had held Rorke’s Drift.
Other arrangements were less happy. The 90th Perthshire Light Infantry, memorably raised by Sir Thomas Graham in 1794, and one of Britain’s most consistently successful regiments in the Peninsular, Crimean and many smaller colonial wars, to its horror became the 2nd Battalion of the 26th Foot, the Cameronians. The new regiment was given the formal title of the Scottish Rifles. The 2nd Battalion continued to call itself the 90th Light Infantry into the First World War and beyond. It never permitted itself to be referred to as the “Cameronians”, a reference to the raising of the 26th Foot from the extreme Protestant supporters of Richard Cameron in 1689.
The 99th, a Scottish regiment from Edinburgh known as the “Moonrakers”, to its surprise found itself the 2nd Battalion of the Wiltshire Regiment, a southern English county regiment. Fortunately few of the new links were as bizarre as this. In the 1960s, when the Royal Berkshire and Wiltshire Regiments were amalgamated, the new regiment was called the “Duke of Edinburgh’s”, a title of the old 99th.
While the Cardwell Reforms created regiments more suited to colonial policing duties, one battalion of a regiment being in Britain, while the other was posted to a colony, the flexibility of the old system, in which officers moved from regiment to regiment depending on the availability of posts, was lost. The British Army still struggles to overcome the disadvantages of the 1882 arrangements.


1 comment:
A nice write up from my favourite Colonial campaign!
Post a Comment